The Group Dialog 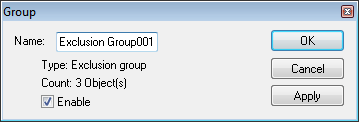
Collision Groups
All objects that are enabled for collision testing are also listed in one of the collision groups that can be found in the navigator window under the Groups»Collision header. When objects are first enabled for collision, they are added to the first collision group in this section (“Collision Group001” by default). Objects can also be enabled for collision by dragging them from the Machines or Heads sections of the model navigator to a particular collision group, or to the Groups»Collision header, which will create a new group containing the dragged object. You can hold the Ctrl key down when dragging to also include all dependent objects in the model navigator tree.
Multiple collision groups can be created for your own organizational purposes, but an object can only appear in a single collision group at a time. Objects can be easily dragged from one collision group to the next.
Delete an object from the collision group to disable collision testing on that object. You can also delete the collision group itself, which disables collision testing on all objects that were in that group. Finally, you can open the Properties of a collision group and disable the collision property of the group. This has the same effect as though the group was deleted (i.e., collision testing will be disabled on all objects listed), without actually affecting the collision enabled/disabled state of the objects themselves. This can be very useful for “what if?” testing of the collision behavior of the model.
Collision Exclusion Groups
When collision testing is enabled on objects that are physically touching, they are then displayed as colliding. One way to avoid this problem is to change the physical definition of objects such that they do not overlap or touch, but this may not always be practical or even possible. VM has a “collision exclusion” feature that provides a much better way of handling this problem.
With collision exclusion, you can tell VM to ignore collisions between groups of related objects. VM will not test for collisions between any objects that reside in the same group, but it will continue to test for collisions between those objects and all other collision enabled objects.
Collision exclusion groups can be found in the navigator window under the Groups»Exclusion header. You create a new group by dragging an object to the Groups»Exclusion header. You add objects to an existing group by dragging them to the group header. You can also drag an entire collision group to the exclusion group header to create a new exclusion group. You can create as many groups as are necessary to handle the collision exclusion requirements of your model. The same object can appear in multiple exclusion groups. Objects and entire groups can be deleted to remove collision exclusion relationships. Finally, you can open the Properties of a collision exclusion group and disable the exclusion property of the group. This has the same effect as though the group was deleted, which can be useful for “what if?” testing.
GENER and CERUN automatically perform collision exclusion on any objects that are colliding when the model is first loaded. However, it is better practice to not rely on this feature, but instead create exclusion groups based on your own understanding of how the model behaves.
Selection Groups
Selection groups are used to combine various objects into a group, so that selecting any one object in the group has the same effect as selecting all of the objects in the group. Grouping related objects in selection groups makes it easier in GENER and CERUN to select and hide (or unhide) a component of the machine.
Selection groups can be found in the navigator window under the Groups»Selection header. You create a new group by dragging an object to the Groups»Selection header. You add objects to an existing group by dragging them to the group header. You can also drag an entire collision or exclusion group to the selection group header to create a new selection group. You can create as many selection groups as are necessary to best represent the grouping of objects of your model. Note though that the same object cannot appear in multiple selection groups. Objects and entire groups can be deleted to remove the selection relationships. Finally, you can open the Properties of a selection group and disable the visibility property of the group, so that the group starts off hidden in GENER and CERUN.
The grouping of objects can make it impossible to select and edit the properties of a particular object in the simulation window if it is grouped with other objects. For that reason, in QUEST only, selection grouping can be toggled on and off using the Simulation»Group Selection menu bar function (and also using the Group button on the VM Construct toolbar).