CERUN Settings
The CERUN launch panel page provides a simple and interactive method of selecting the appropriate set of CERUN processing options. The launch panel remembers the last settings used and saves this information in the Windows Registry. Remembered settings can be recalled via the drop-down lists that appear beside many of the launch panel input fields.
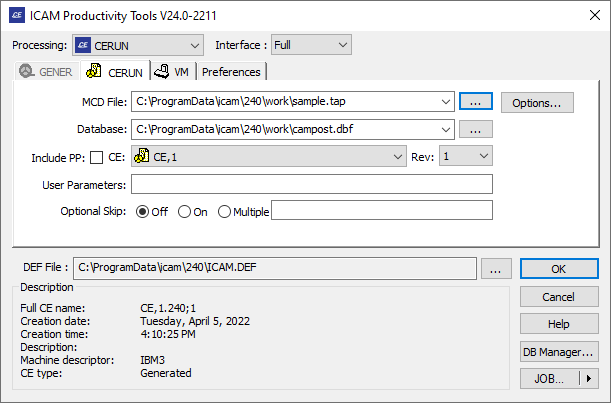
When CERUN is started, the launch panel will be displayed as shown below.
If any required fields are not answered or are invalid the tab icon will have a red cross and the OK button will be disabled until the problem is solved.
Tape File
This input field is used to enter the tape file name, by either typing it in (you must include the full directory path) or by using the square browser button [...] located immediately to the right of the input field. The last four file selections are remembered, and they can be re-accessed by selecting them from the drop-down list. The browse tape file panel remembers the last directory browsed for a tape file
Enter the tape (MCD data) file name and path you want to process, or choose one from the MRU (Most Recently Used) list. This field is required.
When processing in PSE mode, the input field will be grayed out as the GENER output file will automatically be used as the CERUN input.
Database
This input field is used to select the database that contains the control emulator to use. You can browse for a database using the square browse button [...] located immediately to the right of the text window, or you can drag and drop a database (.dbf, .dmp, .dp) file onto the launch panel window. The last four database selections are remembered. They can be re-accessed by selecting them from the drop-down list. The browse database panel remembers the last directory browsed for a database, unless the icam_dbf environment variable is set.
Control Emulator (CE) and Revision (Rev)
Use these input fields to choose a control emulator from the selected database. The control emulator drop-down presents a list of generated and dedicated control emulators (i.e., it shows only those control emulators from the database that can be used by CERUN). The revision field lists the latest revision of the selected control emulator and the drop-down lists other generated revisions, if any. Information about the selected control emulator will appear in the Description box.
CERUN cannot run a CE created with a version of QUEST that is higher than the current version.
Include PP
Select this checkbox to include post-processors as well as control emulators in the CE selection list. CERUN can use the questionnaire information from a post-processor when emulating a CNC machine. This produces the same results as would be obtained by creating a control emulator as a link or copy of an existing post-processor and then generating without customization.
User Parameters
Use this field to pass user defined parameters to the control emulator. Some control emulators alter their behavior based on user-defined parameter data. Anything typed in this input field will be passed to the control emulator as a user-defined parameter in the $UPARAM macro variable.
Optional Skip
Use these input fields to specify a starting condition for the optional skip (also called “block delete”) settings. Use the ON and OFF radio buttons to select the starting setting for those CNC’s that support a single on/off form of optional skip. For CNC’s that support multiple levels of optional skip, ON selects the default optional skip level and Multiple allows a comma or blank separated list of opskip levels to be specified.
CERUN requires the MCD file name, the database and the control emulator name before it can proceed. Everything else is optional.
OK, Cancel and other buttons