The Icam Database
When models are not being worked on in memory, they are stored on disk in an Icam database. The database format is proprietary to Icam. The database is platform independent, allowing it to be used on UNIX and Windows computer types, however starting with V21, Icam no longer supports the creation or modification of databases on UNIX computers. Starting with V22, Icam products no longer run on UNIX systems.
Model File Name Conventions
Each revision of each model is stored in the database under a special name. This name is a combination of the model name and identification number. The default model name is MODEL,1 which can be changed in the “General Information” section of the “General Machine Description” chapter of the Questionnaire, or when saving. The name is of the form:
xxxxxx,nn.vvv;r
The “xxxxxx” part is name of the model. Its length can be a minimum of one character and can have a maximum of 32 characters (including those of the identification number described below). Any combination of letters, digits and underscore “_” characters may be used but the first character must be a letter.
The “,nn” part of the name is an optional identification number of the model. This number can range from 1 through 1. Negative or zero identification numbers are not allowed.
The “.vvv” part of the name is automatically supplied and shows the version number of QUEST that was used to create the model. For QUEST V27, the version identifier appears as “.270”.
The “;r” part of the name is the model revision number. This number increments by 1 each time the model is saved or generated to the database. There is a limit of 9999 revisions of each model that can be kept in the database. Use the database “Purge” and/or “Delete” functions to remove unwanted revisions.
The default name of a model, if unchanged in the General Information section, is:
MODEL,1.270;1
The Database Navigator
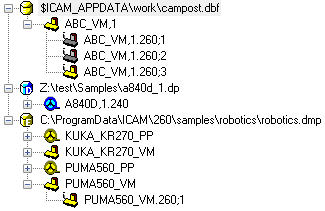
The image at right shows an example of the contents of the Database Navigator window. When Icam Productivity Tools is first installed, the database navigator window will most likely contain a single empty database named campost.dbf.
If you have an earlier version of the software installed on your system, you might see the old database listed with a small “R” character in the database icon. This signifies that the database is read-only. See the “Database Upgrade Procedure” section in the “Installation and Upgrade” manual for details on upgrading all models in the old database to the new version. You can also selectively open models from a read-only database and save them to a different writable database.
Databases are secured with a serial number, defined by the PRISER security key entry in your license file. You cannot access the contents of databases created with a different serial number or with the Icam Foundation product, unless you are specifically licensed to do so with a SECSER security key entry in your license file. A database to which you have no license authority is listed with a grey database icon.
Databases
The navigator view can list many databases. You add databases to the
navigator using the Database»
You remove databases from the navigator using the Database menu-bar Close, Close All and Close All But This selections, or by selecting a database and pressing the Delete key. Removing a database from the navigator has no effect on the actual database (i.e., the database is not affected in any way).
A database can be password protected. This will stop unauthorized
modification of models using QUEST, while still allowing
their use with GENER and CERUN. Note that the GENER and CERUN debugger and macro tracing
features are not available when running against a password protected
database. The Database»
The first time you lock a database, you will be asked for a password
(8 characters maximum). A locked database cannot be read or written
by QUEST, even by the person who locked it. The database must be
unlocked before it can be used by QUEST. To do so, first select it,
then choose the Database»
Synchronization problems can occur when two or more users run QUEST
at the same time and make changes to the same database. By default,
all database information in the navigator view is updated when QUEST
first starts and individual database views are refreshed whenever
model data is read, written or deleted from the database.
You can manually refresh all databases in the navigator window using
the F5 function key. You can have the navigator automatically refresh
the database view on a regular time interval using the
Database»
To see the list of actions that can be performed on databases, select a database name in the navigator view and press the right-mouse button. A pop-up menu will appear listing the most common actions:
Open: Lists the contents of the database in the main work window. Double-clicking on a database name is equivalent to a Open. The View»
By Type menu-bar selection can be used to list a subset of post-processors, control emulators and models in the database matching some criteria. Close: Removes the selected database from the navigator view.
Close All: Removes all databases from the navigator view.
Close All But This: Removes all but the selected database from the navigator view.
Lock: Enables or disables password protection on the database.
Generate: Performs a consistency check on all post-processors, control emulators and models in the database, so that they can be used with GENER and CERUN.
Import: Used to import (read) post-processors, control emulators and models and their dedicated counterparts into the database from a dmp file (see Export below).
Upgrade: This function creates a copy of the selected database with all post-processors, control emulators and models upgraded to the current version (i.e., V27). It is only available if the selected database has been created with an older release (e.g., V26).
Export: Used to export (write) a copy of all post-processors, control emulators and models from the database to an external dmp file.
Copy to Database: Used to directly copy post-processors, control emulators and models from one database to another, avoiding a two step export/
import process. Purge: Removes all excess revisions of all post-processors, control emulators and models in the database, optionally resetting revision numbers to “;1”. This operation will not free up disk space. To free up disk space, export the database contents after purging and import the data into a new database. Delete the old database once you are sure that the copy was successful.
Listing: Creates a printable or browsable listing for all post-processors and control emulators in the database. The listing shows the responses to all questions as well as all customization. Listings are not generated for models, nor for dedicated post-processors and control emulators.
Models
Each database listed in the navigator contains a (possibly empty) list of models. Each model will have at least one revision and quite possibly many revisions in the database. In the database navigator image (see here), there are three revisions of the ABC_VM,1 model: ABC_VM,1.270;1, ABC_VM,1.270;2 and ABC_VM,1.270;3.
You can open a specific revision of a model for editing by double-clicking the revision name (e.g., clicking on ABC_VM,1.270;1 opens the first revision of the model, not the latest one). You can open the most recent revision of the model by double-clicking on the simple name (e.g., clicking on ABC_VM,1 will open ABC_VM,1.270;3, the latest revision of the model). When a model is opened for editing, it will be loaded into memory and its content listed in one of the Navigator tabs. The model name, revision and originating database will all be shown at the top of the Navigator window.
Model revisions shown with a black icon have been saved but not generated. Those with a gold colored icon have been generated and can be used with GENER and CERUN. Those shown with a blue icon are dedicated models. A dedicated model can be used with GENER and CERUN under special licensing, but cannot be viewed or edited with QUEST. A dimmed icon with a red “x” in the upper right corner signifies a hidden model. A model marked as hidden (see below) can not be selected by the user in GENER and CERUN.
To see the list of actions that can be performed on models, select a model name in the navigator view and press the right-mouse button. A pop-up menu will appear listing the most common actions:
Open: Opens the model for editing, by placing a copy of the model into one of the Navigator tabs.
Hide: Marks the model as hidden, making it unavailable for selection by user in GENER and CERUN. This is useful to temporarily remove a model from production use, as well as for making component posts of a hybrid model (i.e., super post) unavailable for stand-alone execution.
Generate: Performs a consistency check on the model, so that it can be used with GENER and CERUN.
Export: Used to export (write) a copy of the model from the database to an external dmp file.
Copy to Database: Used to make a copy of the model to a selected database, using the same name.
Copy: Used to make a copy of the model in the same database, using a different name.
Delete: Used to remove the model from the database. This operation cannot be undone. Once removed (deleted), the model cannot be restored or used.
Rename: Used to change the name of a model.
Purge: Removes all excess revisions of the model, optionally resetting the revision number to “;1”. This operation will not free up disk space.